SublimeREPL
SublimeREPL is a plugin for Sublime Text 2 that lets you run interactive interpreters of several languages within a normal editor tab. It also allows connecting to a running remote interpreter (e.g. Clojure/Lein) though a telnet port.
SublimeREPL has a built-in support for command history and transferring code from open buffers to the interpreters for evaluation, enabling interactive programming.
Note
This documentation is work in progress. Details on language integrations are sorely missing. Please contribute!
Installation
Download Package Control, select Install Package and pick SublimeREPL from the list of available packages. You should have Package Control anyway.
Quick Start
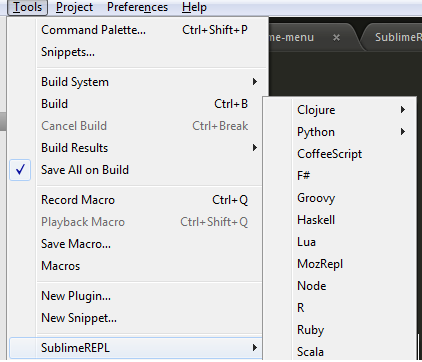
SublimeREPL adds itself as a submenu in Tools. You can choose any one of the preconfigured REPLs and if it’s available in your SYSTEM PATH [1], it will be launched immediately.
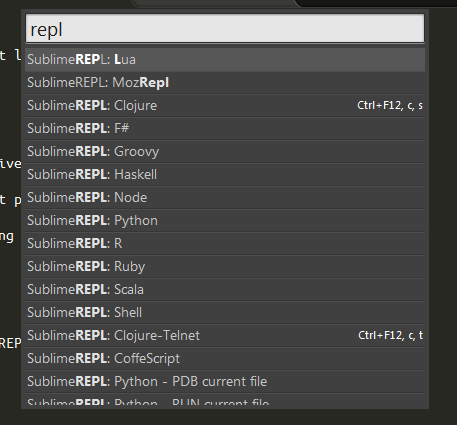
Second and more user friendly way to launch any given REPL is through Command Palette. Bring up Command Palette and type “repl”. You will be presented with all preconfigured REPLs. Running REPL through Command Palette has exactly the same result as picking it from Tools > SublimeREPL menu.
| [1] | One of the most frequently reported errors is SublimeREPL not being able to find interpreter executable, even if it’s visible in your shell. There are several way to fix this problem that we’ll discuss in FAQ. |
You may now use a source buffer to either evaluate text from the buffer in the REPL or copy text over to the REPL without evaluation. For this to work, ensure that the language syntax definition for your source buffer matches the REPL.
Keyboard shortcuts
The default shortcuts shipped with SublimeREPL are listed below. If you are accustomed to another REPL keymap, or if you intend to work in REPL a lot (lispers pay attention!) you may want to rebind the keys more to your liking.
REPL keys
Note
The list below omits the trivial text editing keybindings (e.g. left, right etc). They are nevertheless configurable in keymap files.
| Linux | OS X | Windows | Command used | Meaning |
|---|---|---|---|---|
| Up | Up | Up | repl_view_previous | Walk back to previous input, with autocomplete |
| Alt+p | Ctrl+p | Alt+p | repl_view_previous | Walk back to previous input, no autocomplete |
| Down | Down | Down | repl_view_next | Walk back to next input, with autocomplete |
| Alt+n | Ctrl+n | Alt+n | repl_view_next | Walk back to next input, no autocomplete |
| Enter | Enter | Enter | repl_enter | Send current line to REPL |
| Esc | Esc | Esc | repl_escape | Clear REPL input |
| Ctrl+l | Ctrl+l | Shift+Ctrl+c | repl_clear | Clear REPL screen |
| Shift+Ctrl+c | Shift+Ctrl+c | Unsupported | subprocess_repl_send_signal | Send SIGINT to REPL |
Source buffer keys
Important
The keybindings here use Ctrl+, as a prefix (C-, in emacs notation), meaning press Ctrl, press comma, release both. Pressing the prefix combination and then the letter will immediately send the target text into the REPL and evaluate it as if you pressed enter. If you want to prevent evaluation and send the text for editing in the REPL, press Shift with the prefix combination.
Note
Default source buffer keys are identical on all platforms.
| Key | Meaning |
|---|---|
| Ctrl+, b | Send the current “block” to REPL. Currently Clojure-only. |
| Ctrl+, s | Send the selection to REPL |
| Ctrl+, f | Send the current file to REPL |
| Ctrl+, l | Send the current line to REPL |
Language specific information
SublimeREPL’s integration with a specific language includes language-specific main menu and palette options for REPL startup, keymaps, and special REPL extensions unique to the target language. An integration may contain several different REPL modes which are based on different underlying classes.
Clojure
The Clojure integration supports Leiningen projects. You must install Leiningen to use Clojure integration.
If your Leiningen installation is not system-global, you may need to tweak SublimeREPL configuration (via Preferences > Package Settings > SublimeREPL > Settings - User) so that we can find your lein binary:
"default_extend_env": {"PATH": "{PATH}:/home/myusername/bin"}
To start a REPL subprocess with Leiningen project environment, open your project.clj and, while it is the current file, use the menu or the command palette to start the REPL.
- In subprocess REPL mode, the REPL is launched as a subprocess of the editor. This is the mode you should use right now.
- The telnet mode no longer works because of the changes in Leiningen and nrepl.
The source buffer “send block” command (Ctrl+, b) deserves a special mention. Performing this command while the cursor is within the body of a definition will select this (current, top-level) definition and send it to the REPL for evaluation. This means that the latest version of the function you’re currently working on will be installed in the live environment so that you can immediately start playing with it in the REPL. This is similar to [slime -]eval-defun in emacs.
Additional keybindings are available for Clojure:
| Key | Meaning |
|---|---|
| Ctrl+F12 c s | Launch a subprocess Clojure REPL |
| Ctrl+F12 c t | Connect to a running Clojure REPL |
Python
Both stock Python and Execnet integrations support virtualenv. Various ways to work with Python, including PDB and IPython, are supported.
For virtualenv created environments to be discoverable by SublimeREPL they should be created or symlinked in one of the following:
- ~/.virtualenvs default for virtualenvwrapper
- ~/.venvs default for venv
Alternatively, more paths can be added to “python_virtualenv_paths” in the SublimeREPL configuration file.
Documentation contributions from a Python specialist are welcome.
Configuration
The default SublimeREPL configuration documents all available configuration settings.
Frequently Asked Questions
SublimeREPL can’t launch the REPL process - OSError(2, ‘No such file or directory’), how do I fix that?
Sublime is unable to locate the binary that is needed to launch your REPL in the search paths available to it. This is because the subprocess REPLs are launched, as, well, subprocesses of Sublime environment, which may be different from your interactive environment, especially if your REPL is installed in a directory that is not in a system-wide path (e.g /usr/local/bin or ‘/home/myusername` on Linux, My Documents on Windows etc)
If the binary is not in your system path and you can’t or won’t change that, tweak SublimeREPL configuration:
{
 ...
 "default_extend_env": {"PATH": "{PATH}:/home/myusername/bin"}
 ...
}
I’d like an interactive REPL for Foo and it is not supported, what do?
Chances are, you only need a minimal amount of work to add an integration, and necessary steps are described here briefly.
If you already have an interactive shell for Foo, you can use the subprocess REPL. For an example, see PHP or Lua integration in config/PHP.
If Foo provides an interactive environment over TCP, you can use the telnet REPL. For an example, see MozRepl integration
Supported languages
SublimeREPL currently ships with support for the following languages:
- Clisp
- Clojure
- CoffeeScript
- Elixir
- Execnet Python
- Erlang
- F#
- Groovy
- Haskell
- Lua
- Matlab
- MozRepl
- NodeJS
- OCaml
- Octave
- Perl
- PHP interactive mode
- PowerShell
- Python
- R
- Racket
- Ruby
- Scala
- Scheme
- Shell (Windows, Linux and OS X)
- SML
- Sublime internal REPL (?)
- Tower (CoffeeScript)
Structure of SublimeREPL
Note
If this is your first time dealing with Sublime plugins, you may find it a bit too magical. Basically, Sublime automatically scans plugin directories loads configuration files and plugin code without manual intervention, and reloads them dynamically as soon as they change. The entry points to a plugin’s code are its commands, which are Python objects that extend Sublime’s standard command class. Sublime calls them when needed. There is no initialization entry point or a “plugin loaded” callback or somesuch.
Basics of language integration: configuration and launch commands
A language integration in SublimeREPL consists of configuration files and, where needed, Python code. The configuration consists of:
- Menu configuration files which specify the actual REPL object configuration
- Command palette configuration files
- Optional keybinding configuration files
REPLs are started by SublimeREPL command repl_open. The command and its arguments is usually specified in the menu configuration file, and the other places refer to that configuration item by file name and ID using the run_existing_window_command command.
Simple language integrations use an existing REPL class (see below) without modification. For these integrations, no additional Python code is needed. They use one of the standard REPL classes as the base, as documented below. In most cases, this will be the subprocess based REPL class. An example of such an integration is Lua.
The menu configuration file config/Lua/Menu.sublime-menu contains:
[
     {
        "id": "tools",
        "children":
        [{
            "caption": "SublimeREPL",
            "mnemonic": "R",
            "id": "SublimeREPL",
            "children":
            [
                {"command": "repl_open",
                 "caption": "Lua",
                 "id": "repl_lua",
                 "mnemonic": "L",
                 "args": {
                    "type": "subprocess",
                    "encoding": "utf8",
                    "cmd": ["lua", "-i"],
                    "cwd": "$file_path",
                    "external_id": "lua",
                    "syntax": "Packages/Lua/Lua.tmLanguage"
                    }
                }
            ]
        }]
    }
]
This adds a “Lua” menu item to “Tools > SublimeREPL” which creates a Lua REPL via SublimeREPL command repl_open. The important part to take note of here is the id attribute (repl_lua). This is the ID by which the command palette configuration file refers to Lua REPL configuration.
As you can see, the main way to launch a new REPL is the SublimeREPL command
repl_open (class ReplOpenCommand). The menu configuration file (see
above) specifies the arguments for the command that are used to locate the
desired REPL class and the settings for it so that it can be spawned.
The command configuration file config/Lua/Default.sublime-commands looks like this:
[
    {
        "caption": "SublimeREPL: Lua",
        "command": "run_existing_window_command", "args":
        {
            /* Note that both these arguments are used to identify the file above and
               load the REPL configuration from it
             */
            "id": "repl_lua",
            "file": "config/Lua/Main.sublime-menu"
        }
    }
]
It is obvious that the REPL configuration is concentrated in the menu files,
and the palette configuration only refers to those by ID and file name. The
latter is achieved by the command run_existing_window_command (class
RunExistingWindowCommandCommand)
This command is a wrapper that is used in the command palette configuration. Its function is to execute another command. It takes an ID of a configuration item and the name of a file where the configuration is stored, and scans the available Sublime configuration folders for the file and within the file for the configuration item until one is found. This allows the command palette configuration to specify a reference to the REPL configuration command instead of replicating it. For this reason, actual REPL configuration is concentrated in the menu files.
REPL classes
All REPL instances are descendants of Repl. New integrations can
either provide their own class, or use one of the base classes that ship with
SublimeREPL:
- Class
SubprocessReplfor subprocess-based REPLs. The process running in the REPL is a subprocess of the editor. The input and output of the process is connected to the output and the input of the REPL - Class
TelnetRepl. The process runs outside of the editor, presumably having been spawned externally, and the REPL connects to it over TCP via Python telnetlib.
There are three integrations that provide their own classes:
- Class
PowershellRepl. This is only used by PowerShell integration. - Class
ExecnetRepl. This is only used by Execnet Python integration - Class
SublimePythonRepl. A REPL over SublimeText’s internal Python interpreter.
All these can be found in the plugin’s repl/ subdirectory.
A REPL class is expected to provide a standard interface for SublimeREPL integration:
-
read_bytes()¶ Read and return some bytes from REPL’s incoming stream, blocking as necessary.
ReplManagerwill set up a separate thread with aReplReaderpump that keeps polling this method.
-
write_bytes(bytes)¶ Write some bytes to REPL’s outgoing stream. User input in the REPL view’s command line will be delivered here.
REPL initialization sequence
- User interaction causes the execution of repl_open command. Its arguments are usually taken from a menu configuration file.
- The open() method of ReplManager is called, where a Repl instance and a ReplView instance get created
- Within the ReplView constructor, the read and write loops get started. The REPL is now alive.
REPL manager
Class ReplManager is responsible for managing REPL instances
(subclasses of Repl). It initializes new REPLs by:
- Creating REPL instances
- Providing an instance of the Sublime view associated with the REPL by reusing an existing one, or creating a new one
- Creating and remembering a named
ReplViewinstance that couples between the two.
REPL views
A ReplView instance is a coupling between a REPL instance and a
Sublime view. Its main responsibility is to create Sublime views and maintain
the loops that read from, and write to, the REPL.
- The incoming data from the REPL is read in a separate thread using
ReplReader, because read operations are assumed to be blocking - The outgoing data is written into the REPL by ReplView’s method py:method:update_view_loop. This method is called by ReplView’s constructor at the very end and, as long as the associated REPL object is alive, will reschedule itself with Sublime’s py:method:set_timeout.